

How To Fix An Overexposed Picture In Photoshop

How To Instantly Darken Overexposed Images With Photoshop
In this tutorial, we'll learn how to instantly darken an overexposed image with Photoshop using a simple aligning layer and a layer alloy mode! I'll be using Photoshop CC hither but this tutorial is likewise compatible with Photoshop CS6. If you're using CS5 or before, you'll want to follow forth with the original version of this tutorial.
In the previous tutorial, nosotros learned how to brighten underexposed photos using a technique very similar to the ane nosotros'll be learning here. Both techniques work past simply calculation a Levels adjustment layer higher up the prototype so changing the adjustment layer's blend mode.
Equally nosotros'll see, when using these methods to correct exposure problems, the only real deviation comes downwardly to which blend fashion we demand. To brighten a night image, we used the Screen alloy fashion. This time, to darken an image that's looking too bright, we'll utilize Photoshop's Multiply blend mode. Let'south see how information technology works!
Here'southward a photo I shot recently at a local garden shop. Unfortunately, being the mindful person that I am, I forgot that I had previously bumped upwards the exposure compensation on my camera for an earlier shot, resulting in an image that's overexposed:
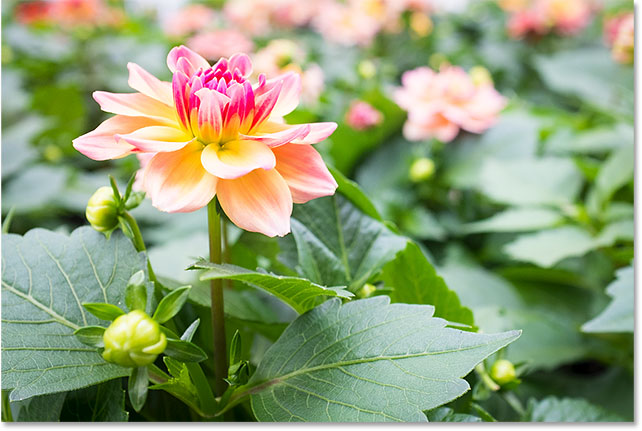
The original, overexposed image. © Steve Patterson.
If y'all've already read through the previous Instantly Brighten Underexposed Images tutorial, near of what we'll be covering here will seem familiar to yous. But rather than brightening this image even more, allow'due south learn how nosotros tin apply the same bones technique to darken information technology. Allow's get started!
How to Gear up An Overexposed Photo
Step i: Add A Levels Adjustment Layer
With the prototype newly opened in Photoshop, if we take a quick await in our Layers panel, we detect the image sitting on the Groundwork layer, currently the just layer in the certificate:

The Layers console showing the paradigm on the Background layer.
To darken the image, we'll utilise a Levels adjustment layer. To add together ane, click on the New Make full or Adjustment Layer icon at the bottom of the Layers console:
Clicking the New Fill or Adjustment Layer icon.
And then, choose a Levels aligning layer from the list that appears:

Choosing a Levels aligning layer.
Cipher will happen nevertheless to the paradigm, but if we expect once more in the Layers panel, we now run into our Levels aligning layer, named "Levels 1", sitting above the prototype on the Background layer:

The Layers panel showing the adjustment layer above the image.
Step ii: Change The Adjustment Layer's Alloy Manner To "Multiply"
The controls and options for the Levels adjustment layer appear in Photoshop's Properties panel. But for this technique, we won't need to use them. Instead, to darken the image, all we need to do is change the alloy fashion for the Levels adjustment layer.
Y'all'll find the Blend Manner selection in the upper left of the Layers panel. By default, information technology's ready to Normal. Click on the word "Normal" and alter the blend manner to Multiply:

Irresolute the blend manner of the aligning layer to "Multiply".
Multiply is 1 of several layer blend modes in Photoshop that darken an image, and simply by irresolute the blend mode of the aligning layer to Multiply, the photograph at present appears darker, with more detail visible in the highlights and colors now looking richer and more saturated:

The Multiply blend mode instantly darkens the image.
To help run into the deviation, I've zoomed in on the flower for a side-by-side comparing. The original, overexposed version is on the left; the darkened version is on the correct:

A comparing of the original (left) and darkened (right) versions.
Step three: Lower The Opacity Of The Adjustment Layer
If, afterwards changing the blend mode to Multiply, you find that your photograph is now looking too dark, we can easily bring back some of the original effulgence. All we need to practise is lower the opacity of the Levels adjustment layer. You'll find the Opacity option in the upper right of the Layers panel, directly beyond from the Alloy Mode option.
By default, the opacity value is fix to 100%. Keep an eye on your image as yous lower the opacity. The more you lower it, the more the original paradigm on the Background layer volition bear witness through the adjustment layer. I'll lower mine down to 60%:

Lowering the opacity of the adjustment layer to fine-melody the effulgence.
Before And After
To compare the event with your original image, click on the Levels adjustment layer'due south visibility icon (the eyeball) in the Layers panel to temporarily turn the adjustment layer off:
Turning the aligning layer off.
With the adjustment layer turned off, we see our original, overexposed prototype:
Viewing the original prototype for comparison.
To compare that with the edited version, click one time over again on the adjustment layer's visibility icon (the empty box) to turn the adjustment layer dorsum on:

Turning the adjustment layer on.
And here, with the Levels adjustment back on and the opacity lowered to 60%, is my terminal issue:

The terminal upshot.
And in that location we have information technology! Equally we learned in this tutorial and in the previous tutorial, Photoshop makes it easy to prepare modest exposure bug simply by adding a Levels aligning layer above our epitome and changing its blend mode. Use the Screen blend mode to brighten underexposed images, or employ the Multiply alloy fashion to darken overexposed images!
While this technique works bully with casual, everyday photos, information technology won't requite you the kind of professional-level results you'll want for more of import images. For that, a smashing place to start is past learning how to utilise the full ability of a Levels epitome adjustment to properly gear up tonal problems, heave contrast and actually make your images pop!
Be sure to check out our Photo Retouching department for more Photoshop paradigm editing tutorials! And don't forget, all of our tutorials are available for download every bit user-friendly, high quality PDFs!
Other Stuff
© 2022 Photoshop Essentials.com.
For inspiration, not duplication.
Site blueprint past Steve Patterson.
Photoshop is a trademark of Adobe Systems Inc.

How To Fix An Overexposed Picture In Photoshop,
Source: https://www.photoshopessentials.com/photo-editing/instantly-darken-overexposed-images-photoshop/
Posted by: ridleyrenec1960.blogspot.com
0 Response to "How To Fix An Overexposed Picture In Photoshop"
Post a Comment